✨IPN (Instant Payment Notification)
Operation Title: Instant Payment Notification (IPN)
Over view: In the IPN we can configure, validate, and test bank account details for IPN integration.
Key Features:
- Functionality of IPN
- Refresh and Sync
- Region Selection (Precondition)
- IPN Data Form (Case ID, File Upload, Description)
- Query Account (Region, Server, Account Number)
- Telnet and IPN Configuration (Remote/Local Host, Ports, TLS)
- IPN Testing and Invoke Validation (Payload, Response, OpenResty Control)
- Redis Cache Maintenance and Final Output (Validated IPN Setup)
- IPN records table
- View more and Responses info
- Final output for the IPN summery
- Final Output – KRA Update Results
List of Figures:
- Figure 8.1 – Search Bar for Case ID or Filename
- Figure 8.2 – Refresh Button with Red Circular Arrows
- Figure 8.3 – Region Selection from Navbar (Precondition)
- Figure 8.4 – Query Account Input Fields
- Figure 8.5 – Telnet Host, URL, and Port Section
- Figure 8.6 – IPN Configuration Form
- Figure 8.7 – IPN Testing Payload and Response
- Figure 8.8 – IPN Validation and OpenResty Controls
- Figure 8.9 – Redis Cache Maintenance Interface
- Figure 8.10 – IPN Data Table (Username, Date, Account)
- Figure 8.11 – IPN Data table (Description, Quary Account, Remote port)
- Figure 8.12 – Response Info View Section
- Figure 8.13 – View More Pop-Up
- Figure 8.14 – Query Account Response
⚡Overview
The IPN (Instant Payment Notification) testing process is a structured approach used to configure and validate account details received from bank teams across three regions Uganda, Tanzania, and Kenya. Each request typically contains key information such as the account number, URL, currency type, and branch code. The main objective is to ensure that the provided details are correctly configured in Redis and validated through a series of five steps. It is essential to identify the country of origin for each request, as configurations may vary based on the region. The overall process helps in verifying connectivity, performing system-level checks like telnet and IPN validation, and maintaining Redis cache stability. This ensures accurate integration with the bank's systems and quick detection of any errors that need to be communicated back to the bank team for resolution.
⚡Introduction
The IPN (Instant Payment Notification) testing process in Extio is designed to validate and configure account-related requests received from partner banks in Uganda, Tanzania, and Kenya. As part of this process, the bank teams send account numbers along with supporting details such as URLs, currency types, and branch codes. These inputs are used to perform a series of validation steps to ensure proper integration with the Redis system and connectivity with the bank's servers. Given that each region may have different configurations, it is important to correctly identify the source country of each request. This introduction sets the stage for a structured five-step workflow that helps verify account status, test server connectivity, and ensure Redis cache readiness for reliable IPN processing.
Functionality
🔍 Search Bar
Users can search for specific files by entering text like a case ID or filename. This makes it easier to quickly find the needed file without browsing through the whole list.
🔄 Refresh Button
Red Circular Arrows: Refreshes the table to display the latest updated data.
.png)

How to use the IPN data Form?
➤ Here region selection is optional, but mandatory selections must be made on the Quary Account form shown in the fig-8.2.
- The user may enter a specific region and server name.
- The user can enter a specific account number which was send by a bank in a slot.
- At last, enter a description and Submit the form.
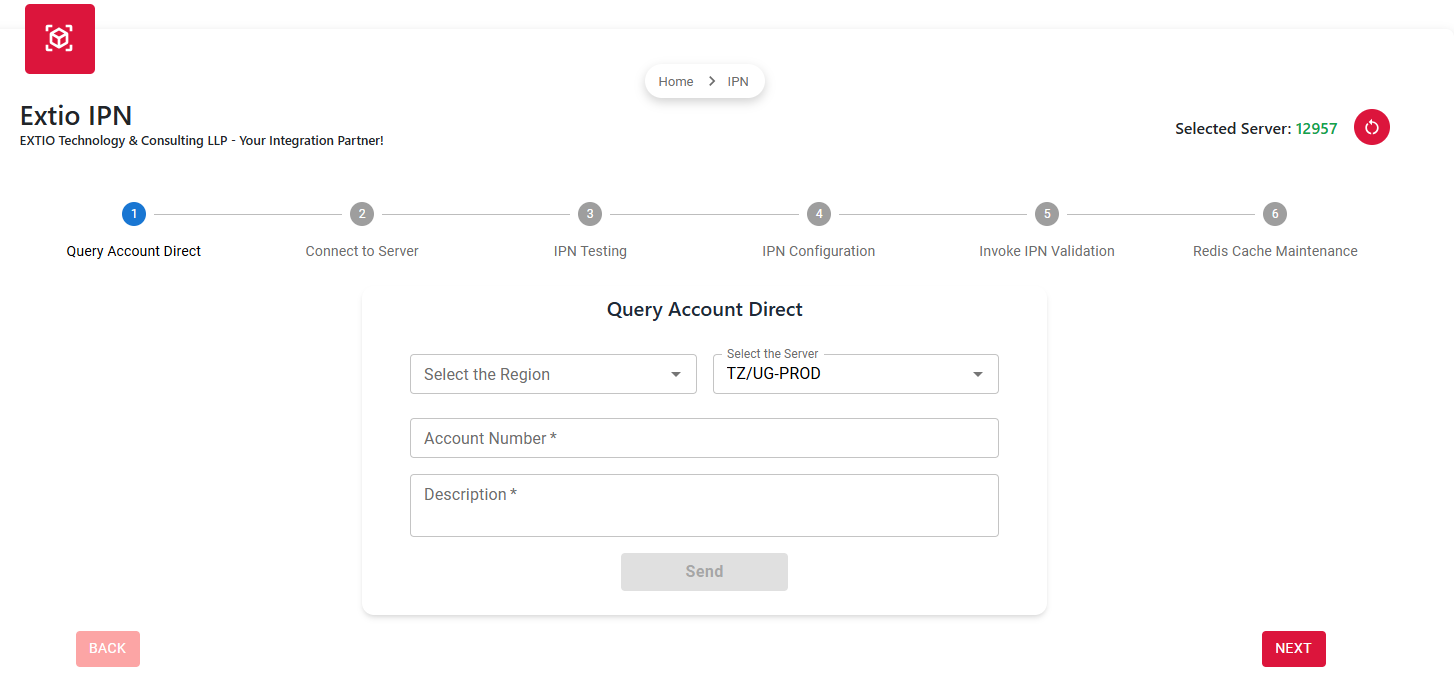
🎯 Query Account Direct
The users can select the region, choose the appropriate server name, enter the account number which was send by the bank team, and provide a relevant description. This ensures accurate identification and smooth processing of the request.
➤ Here user may enter the account number provided by the bank team.
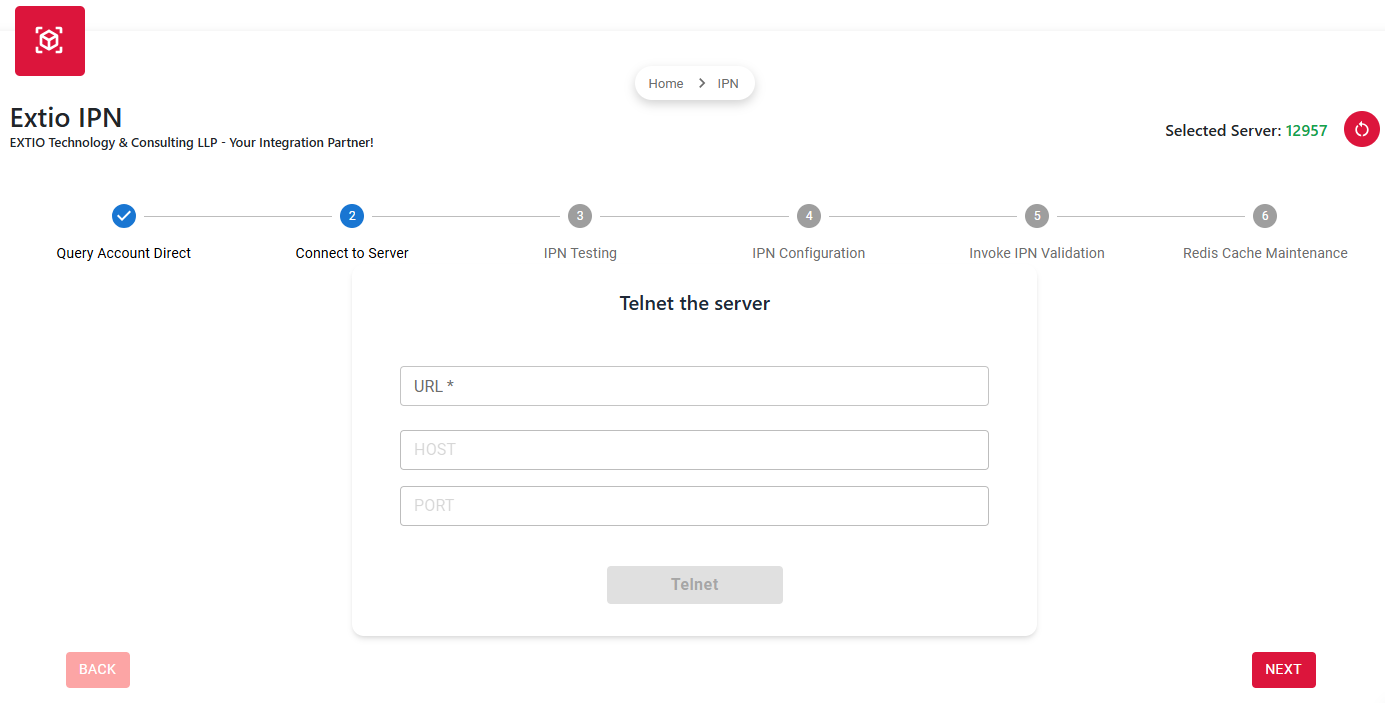
🌐 Telnet the server
In the Telnet section of the server form, users can select the URL which was send by the bank team, specify the host and port, and then click the Telnet button to initiate the connection. This helps verify server accessibility and ensures that the network parameters are correctly configured.
➤Here user may enter the URL provided by the bank team.
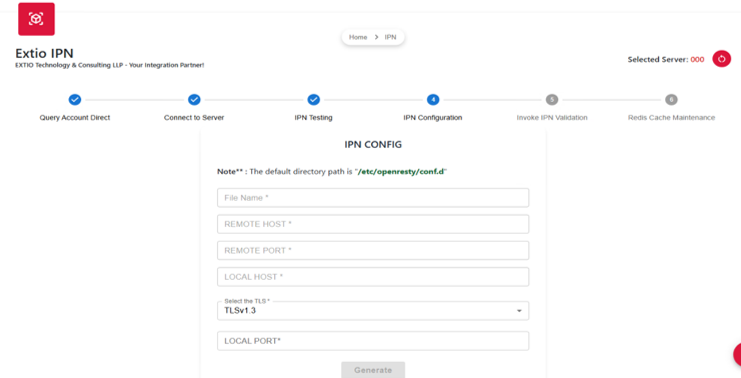
⚙️ IPN Config
Users can select the file name, specify the remote host and remote port, choose the local host, enable TLS if required, and set the local port. Once all details are entered, clicking the Generate button will initiate the configuration process. This setup ensures secure and accurate communication between systems using the defined IPN parameters.
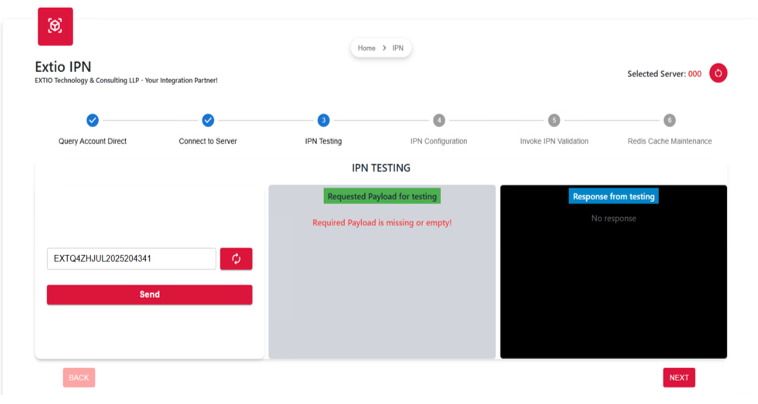
🧪 IPN Testing
The reference number is automatically generated by default. After sending the request, the system displays the payload and response received from the testing environment. Once the response is reviewed, users can click the Next button to proceed with the workflow.
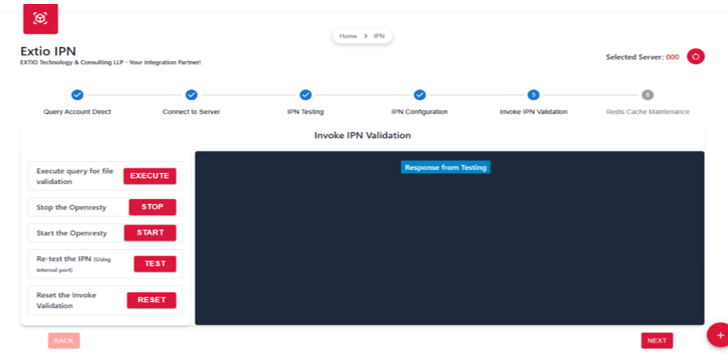
✅ Invoke IPN Validation
Users can perform a query to validate the IPN file and manage the operational state of the OpenResty service. This includes stopping and starting OpenResty as needed. Additionally, users have the option to re-test the IPN and reset the invoke validation process. These actions ensure the file is properly validated and the IPN configuration functions as expected during testing and deployment.
- Execute: Execute query to validate the uploaded file within the IPN workflow.
- Stop: Stop the service to halt IPN validation operations.
- Start: Start the service to initiate IPN validation.
- Test: Here, we can re-test the IPN configuration using the internal port to ensure proper connectivity.
- Reset: If any errors or unwanted data are found, corrective actions can be taken this is why the reset option is available.
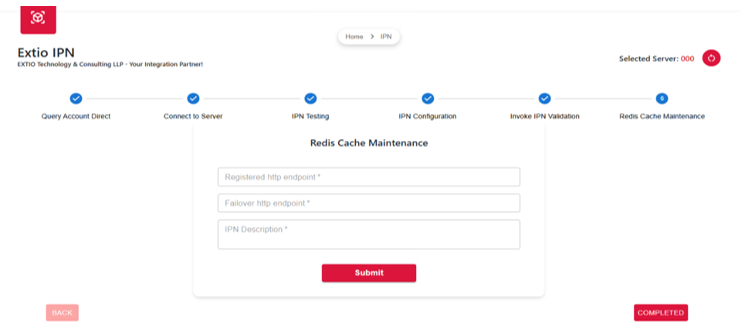
🗄️ Redis Cache Maintenance
In the Redis Cache Maintenance section, users can register the HTTPS endpoint and configure the failover HTTPS endpoint. The IPN description is automatically populated by default based on the configuration. This setup ensures reliable endpoint management and supports high availability through failover mechanisms.
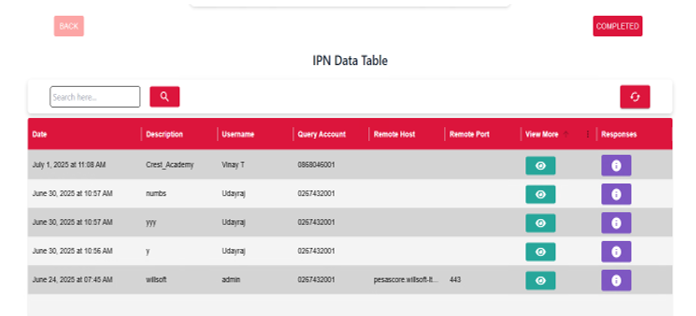
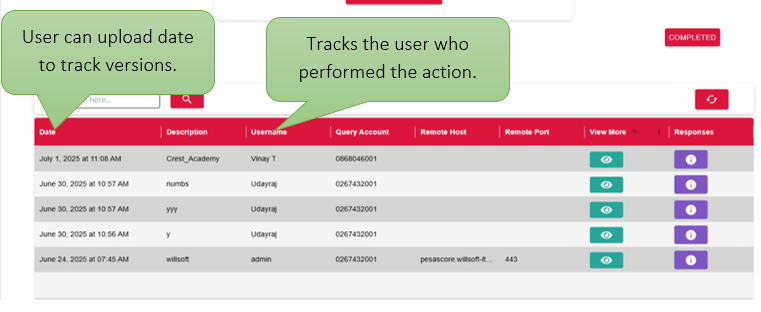
IPN Records Table
| Field | Description |
|---|---|
| Date | Shows the exact date when the file was uploaded, so users can keep track of when files were added and manage different versions easily. |
| UserName | The recorded name of the user who performed the action for audit purposes. |
| Field | Description |
|---|---|
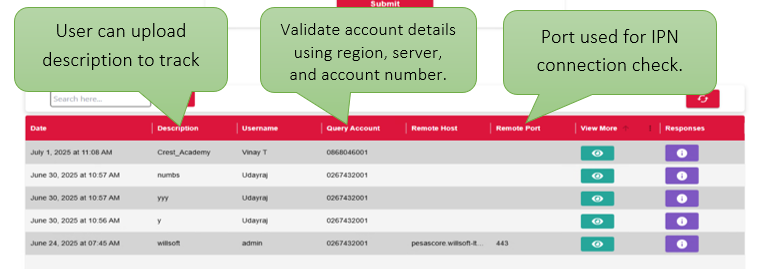
| Description | A short remark entered by the user to define the purpose or context of the IPN configuration. It helps in identifying and managing IPN entries effectively. |
| Query Account | Allows the user to retrieve account-related information by selecting region, server name, and entering account details. Useful for validating IPN configurations against account data. |
| Remote Port | Specifies the port number on the remote server used for IPN communication, enabling proper network connectivity and data exchange. |
| Remote Host | Defines the IP address or domain name of the remote server to which the IPN request is sent. It ensures the request reaches the correct destination. |
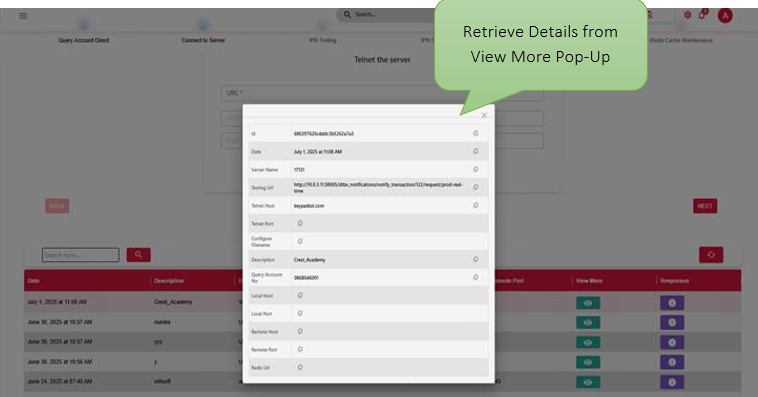
👁️ View More
The pop-up window provides a centralized view of all key connection and query related details including server name, testing host, port numbers, and query account. It enables users to conveniently verify the entire configuration before proceeding, ensuring accuracy during setup or troubleshooting. By consolidating essential information in one place, the pop-up improves usability and minimizes the risk of missing critical parameters.
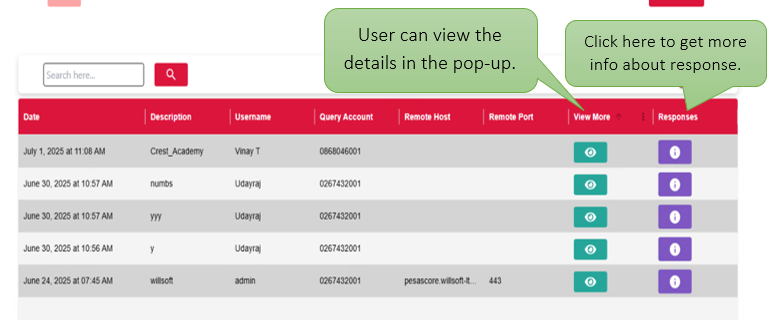
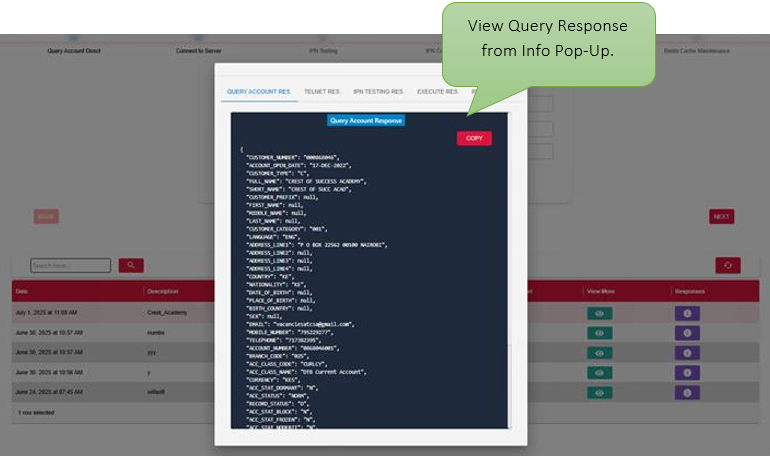
📊 Responses Info
The Query Account Response section presents the complete JSON output received after submitting a query request. It includes critical details such as the customer name, account status, response code, bank and branch information, and other relevant metadata. This structured format allows users to thoroughly review all returned values in one place. By providing a clear and centralized response view, users can quickly confirm if the request was successful, identify any issues, and verify key account-related data. Additionally, the Copy button enables easy extraction of the response for documentation, analysis, or further processing.
🎯 Final Output:
At the end of the IPN testing process, all provided account details such as account number, URL, currency type, and branch code are successfully validated and correctly configured in the Redis cache. Region-specific configurations are applied based on the originating country, ensuring accurate setup. Connectivity tests, including telnet, confirm that the designated host and port are responsive. The system also verifies payload and response handling, ensuring proper communication with the bank's infrastructure. Any errors encountered during testing are flagged for resolution and communicated to the bank team. Once all validation steps are completed, the IPN setup is considered ready for deployment, enabling secure and stable transaction notifications.